激光三维扫描
本文将深入探讨一项热门的三维扫描技术——激光三维扫描。通过阅读本文,您将了解激光扫描仪的类型、工作原理、合适的应用场景以及扫描仪的具体用途。

如今,我们有多种方式、不同科技,可以为虚拟三维空间复制真实世界的物体。多种三维扫描仪都能实现:桌面式、手持式、三脚架式扫描仪;工业级或消费级扫描仪;照片扫描仪、摄影测量扫描仪;接触式测量系统;内置激光雷达传感器的智能手机或平板电脑;移动式、地面式、机载系统等等。
本文将聚焦最常用的激光三维扫描扫描技术,它被广泛应用于建筑、土地测绘、法医鉴定、遗迹保护等领域。通过本文,您将了解激光扫描仪的类型、工作原理、适用场景与具体用途。
三维激光扫描仪
人们听到“激光三维扫描仪”时,脑海里可能会浮现出适用于不同场景和领域的不同扫描设备。例如,一位工业设计师,可能会联想到一台便携式手持设备,能近距离捕获中小型物体。一位建筑工人,可能会想到一台三脚架式的地面型扫描仪,用于大型物体的测绘与测量,例如楼房或整个户外空间。而一位测绘技术员,可能会想到一辆带有机载扫描系统的汽车或无人机,可以在运行或飞行过程中绘制地形图。这些都是正确答案,以上设备都可称之为三维激光扫描仪。
那么,到底何为激光扫描?哪些设备能称之为激光扫描仪呢?
简而言之,激光扫描就是将激光作为光源,从真实世界为一件或多件物体、环境捕获精准三维信息的过程。扫描仪将激光投射至物体,形成点云,即数百万精准测量的点,以XYZ轴形式记录,以体现物体空间位置。部分激光扫描仪支持以点云形式下载模型,而有些扫描仪会自动将点云转换成三角网格,可继续转换成CAD模型,如果支持记录纹理,也可转换成全彩3D模型。

为近海船准备一台长距激光扫描仪(供图:ASOM)
和之前我们介绍过的接触式测量系统不同,激光三维扫描仪100%无接触,不会造成物体任何损伤,牢固物体或易碎物体,均能捕获。激光扫描仪可用于室内作业,部分支持室外,白天黑夜均可使用,既有固定式,也有便携款,可扫描小微型到超大型的各类物体和场景。
要点
非接触式和非破坏性激光扫描仪捕获物体表面上的大量点,形成XYZ坐标轴,以计算物体尺寸,完成3D重建,确定物体空间位置,十分精准。
根据不同应用场景,既有可手持的便携独立型三维激光扫描仪,也有三脚架固定型设备,同时,也可作为复杂解决方案的一道工序,例如机械臂、移动式或机载式激光扫描系统等。从技术分类来看,还可分为飞行时间、相位、三角测量技术扫描仪。
下面,我们具体介绍各类常见的激光扫描仪及其工作原理。
激光扫描仪类型
#1. 飞行时间技术
这类激光扫描仪通常用于长距数据捕获,采用飞行时间技术(TOF)。这类三维扫描仪的工作原理和激光测距仪的工作原理相同:发射激光脉冲至物体,部分脉冲从物体表面返回至扫描仪。与物体的距离即可通过脉冲的飞行时间计算出来,采用以下公式:距离 =(光速x 飞行时间) / 2。这个数据用于计算激光束触及点的坐标值。
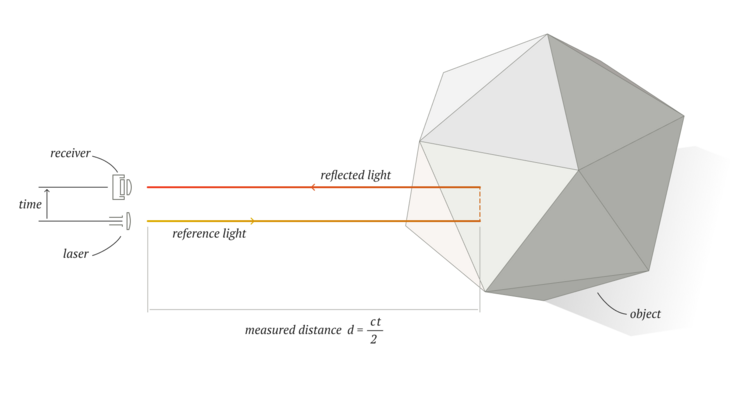
飞行时间技术的工作原理
飞行时间三维扫描仪的捕获距离可高达1000米。不过,常见工作距离为5-300米。虽然TOF系统捕获距离较远,但捕获数据的速度最慢,约为每秒几百至几千点。
设备测量返回信号时间的能力决定了TOF技术的精度。尽管不同系统的精度规格各有不同,但TOF扫描仪的精度一般为4-10毫米。新款TOF设备还可能配备RGB功能,通过内置或外接摄像头采集色彩。
#2. 相位技术
相位三维扫描仪发射交替频率的激光束,通过测量发射与返回信号的相位差来测定物体距离。与飞行时间扫描仪不同,相位扫描仪的工作距离最多为80-120米,常见工作距离为1-50米。
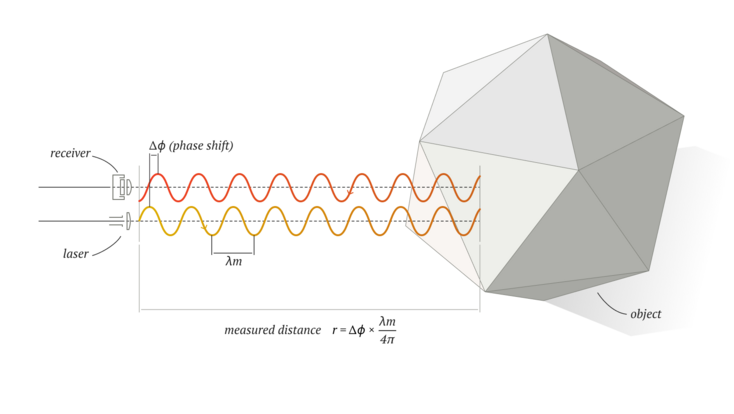
相位测量技术的工作原理
相位式三维扫描仪通常被认为是速度最快的激光扫描仪,部分设备的捕获速度高达一百万点/秒。此外,这类设备的准确度和分辨率高于TOF扫描仪。和TOF扫描仪一样,它们也包括内置或外置色彩捕获功能。
要点
所有激光扫描仪都会发射激光,但采用不同技术来解读返回信号。飞行时间扫描仪记录光束从物体表面返回的时间,相位扫描仪记录发射与返回信号的相位差,三角测量扫描仪计算发射光束返回传感器的角度。
相位扫描仪由于精度高,最适合捕获中型物体,例如大型泵、汽车和工业设备。相位和飞行时间设备都能用于地面扫描项目,可为几米到几千米的超大型物体、结构完成测绘。
地面TOF和相位扫描系统都有固定式、三脚架式设备,可以单独使用,也可以安装在地面或飞行器上,用于采集广阔地貌或无法抵达区域的信息。
#3. 三角测量技术
第三类激光扫描仪采用三角测量技术,激光发射后返回至机载相机图像传感器阵列上的某个特定位置。为计算物体与三维扫描仪之间的距离,设备采用三角测量法,因为激光源、传感器、物体上的标记构成一个三角形。激光源与传感器之间的距离、激光与传感器的角度都是非常精确的。激光反射回传感器后,系统可以测量其与传感器之间的角度,从而计算激光源到物体表面的距离。
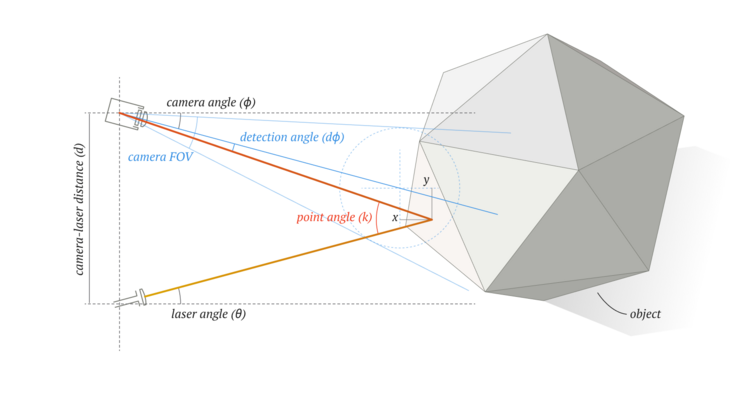
三角测量法的工作原理
三角测量激光扫描仪的工作距离(小于5米)比飞行时间、相位扫描仪短,这是因为图像传感器的动态范围比较小,且距离越远,精度越低。多数三角测量设备也配备内置RGB采集功能。
通常来说,三角测量扫描仪最适合扫描小型物体,根据设备性能,扫描距离为1厘米到2、3米。从外观来看,有固定式和三脚架式三角测量扫描仪。但是,该技术配合便携手持式三维扫描仪效果最佳。
激光扫描仪应用场景
激光扫描仪可用于诸多领域、诸多场景:从建筑、土木工程到法医、考古。随着技术成本越来越低、设备越来越小巧轻便,越来越多的行业开始采用激光扫描。下面,我们介绍一些常见的应用场景。
逆向工程

使用短距三角测量激光三维扫描仪扫描汽车底盘
从小型机械部件到大型工业品,激光扫描仪已成为产品设计和开发人员工具箱的必备工具。过去,一项复杂工艺需要耗时多天才能完成组装,还要手工测量,部件检测的过程十分痛苦,但有了激光扫描仪,通过逆向工程制作CAD表面模型只要几分钟,制作参数化CAD模型只要几个小时。如果部件受损或变形,需要重新设计却有没有CAD数据,那么就可以用扫描仪来制作精准的数字蓝图。带有嵌入式处理器的便携式激光扫描仪非常适合检测中小型物体,而中距和长距扫描仪非常适合大型物体的检测。快速完成CAD模型,能节省数小时甚至数天的时间,让研发团队专注于产品改进。
质量检测

使用激光扫描仪检测水管
质量检测是制造过程中的另一个重要环节,也是激光扫描仪大显身手的领域。过去,质检常常采用手动接触式测量法,而现在,得益于激光扫描品质,工作流程速度更快,精度更高,测量数据也更多。反过来,迭代循环就更少,产品交付时间也会更短。CMM通常一次只能采集几十个点,需接触物体表面,还要为每个检测部件编程,而激光扫描仪不同,它可以在很短的时间内,为几何复杂的各类物体捕获数百万个测量值,且无需接触物体表面。
要点
无论是工业生产还是非工业领域,激光扫描仪都被认为是非常高效的测量工具,包括逆向工程、质量控制、法医、自动驾驶汽车。
短距激光三角测量扫描仪有便携手持型设备,无论何种设备,位于何处,都能享受极致的灵活。这类设备非常适合捕获高度复杂、无法手动或借助探头测量的部件。由于质量轻便,质检人员现在更加灵活机动,不用被束缚在特定的操作地点。
长距激光扫描仪适合为大型物体进行检测,完成精准测量,还能配合使用手持式扫描解决方案,为小型元素完成高清捕获。激光扫描仪捕获的3D模型,可在扫描处理软件中处理,随后转换成CAD文件。这时,还能与原始CAD模型对比,识别出超出公差范围的部位。
法医鉴定

使用三角测量激光三维扫描仪捕获犯罪现场
由于激光扫描仪能捕获房间内部、楼房、完整场地等大型空间,因此它也成为精细记载、犯罪现场调查、事故再现等场景中的得力助手。和相片、视频、卷尺等传统证据搜集方式不同,激光扫描仪让调查人员得以捕获犯罪现场的原貌,每件证据都能精准测量,无论是尸体、脚印还是弹孔,都能在几分钟内完成。
带有嵌入式处理器的便携式手持激光扫描仪,适合一天需在多个地点捕获物体的项目。如需更精准的数据,也可使用手持式扫描仪,例如近距离扫描尸体、破损的家具,或者扫描罪犯留下的脚印。而长距扫描仪适合捕获整个现场。将其放在房间中央自动扫描,调查人员就可以和证人、受害人谈话,或进行其他调查工作,无需再控制扫描仪。三维数据让法医对犯罪现场有了更为全面详细的认识,也能让庭审案件更具说服力。
建筑(BIM)

使用三脚架长距激光扫描仪扫描仓库
对于中距和长距地面型激光扫描仪而言,另一种常见应用场景,就是三维捕获楼房或整个建筑工地,对建筑师和建筑人员而言更是司空见惯。通过这类设备,设备所有人或建筑项目管理员就能快速完成精准记录,为楼房制作3D模型,记录详细情况。此外,这些设备也可用于施工进度跟踪或新建项目的质检,对比成品建筑与设计模型。激光扫描仪不仅节省了手动测量的时间和成本,也大大提升了施工安全,对于一些风险较大的项目而言,非常重要。建筑项目的整个周期都可以使用激光三维扫描仪,保存好大量三维数据,还可用于今后项目的翻新或全新项目,也能随时查看。
考古

使用手持式短距激光扫描仪捕获三角龙头骨(供图:David Cano / 3D Printing Colorado)
另一个激光扫描仪不可或缺的领域就是考古,在考古挖掘现场,无论是灭绝物种的一根骨头,还是整座古城,都能进行3D记录。带嵌入式处理器的便携式手持激光扫描仪还能在野外工作,方便灵活,考古学家记录任何想记录的考古发现。得益于设备上自带的屏幕,他们还能实时看到模型的构建过程,无需另外携带电脑或平板。长距地面型和机载激光扫描设备也能成功应用于地形测绘、挖掘规划,发现研究人员无法用肉眼看的考古遗址,让历史不被埋没。
过去,考古学家只能使用全站仪、GPS设备、摄影测量法等方式搜集数据,而有了激光扫描仪,考古学家搜集高清可靠数据的速度就比原来快了许多,在考古挖掘过程中,为他们节省了数百小时的时间。由于扫描仪无需接触物体表面,不具破坏性,还能用来捕获易碎文物,保留它们的原貌。捕获数据可用于考古记录,也能制作虚拟模型,用于文物修复保护和文物展览。
移动测绘

车载激光测绘系统
移动测绘是长距激光扫描仪的另一种应用。移动测绘是指通过陆上移动车辆(汽车、火车、船只)或空中飞行器(无人机、直升机、飞机)收集三维地理空间数据的过程,也就是收集物体在地球上的具体位置。移动测绘系统通常装有各种导航和遥感技术,例如GNSS、摄像头、激光雷达。结合所有技术,专业人士即可记录、测量、认识某个环境,完成可视化,适合管理公路铁路网络、城市规划,分析水下或地下结构,提升发电厂基础设施安全性,设计数字地图等大量场景。
埃太科三维激光扫描仪
文末,我们再来看几款激光扫描仪产品。埃太科三维推出了两款激光扫描仪。一款为手持式设备Artec Leo,适合近距离(0.35-1.2米)扫描大中型物体,另一款为相位扫描仪Artec Ray,操作距离高达110米。
Artec Leo

Artec Leo完美适合大中型物体的扫描,分辨率高达0.2毫米,精度高达0.1毫米
Artec Leo是一款便携型手持扫描仪,采用三角测量结构激光技术,适用范围广,在同类产品中表现优秀。这是因为设备内置处理器,搭载HD显示屏、Wi-Fi功能、电池,可以实时查看扫描效果,无需任何其他设备(电脑或平板)。扫描仪可捕获3500万点/秒,点云细节丰富,精度高达0.1毫米,分辨率高达0.2毫米,几秒即可搞定。Leo扫描范围广(最大可达838 × 488毫米),可扫描处理各类尺寸的物体,小至20-30厘米的零部件,大至50-200厘米以上的大型物体乃至整个场景。Leo采用1级VCSEL激光束,对眼睛完全没有伤害,可用于静物和人体的扫描。Leo给人灵活自由的扫描体验,因此,使用场景十分广泛:逆向工程、CAD设计、医疗保健、考古、法医鉴定等等。
Artec Ray

Artec Ray善于捕获大型物体,最远工作距离110米,精度达亚毫米级
Artec Ray是一款长距相位激光扫描仪,专门用于大型和超大行物体的捕获,例如楼房、飞机、风力涡轮机,精度达亚毫米级。扫描仪工作距离可达110米,机身可自身旋转360度,垂直转动270度,每秒捕获20.8万点。和许多长距扫描仪不同,Ray捕获的数据精准、干净,可用于逆向工程和质量检测。此外,设备配有三脚架,内置电池、机载Wi-Fi,还有手机APP远程控制扫描仪,扫描仪可留在室内外自主工作。Artec Ray捕获的数据还能与其他埃太科手持扫描仪的数据结合,让细节丰富的高密度数据锦上添花。
Phase shift
Phase shift 3D scanners emit laser light at alternating frequencies and determine the distance to an object by measuring the phase difference between the emitted and reflected signals. Unlike the time of flight scanners, phase shift scanners work at shorter ranges from 80 to 120 meters maximum, with a typical operating range of 1 to 50 meters.

Phase-based 3D scanners are often categorized as the fastest laser scanners, with some systems claiming a caption rate of up to a million points/second. They also have higher accuracy and resolution than TOF scanners. And, like TOF scanners, they include internal or external color capture options.
Key point
All laser scanners send out laser light but employ different technologies to interpret inbound signals. Time-of-flight scanners log the time emitted light takes to return once it’s bounced off the surface of an object, phase-shift scanners measure the phase difference between emitted and reflected signals, and triangulation scanners calculate the angle at which an outbound beam returns to the sensor.
Thanks to their high accuracy, phase shift scanners work best for medium-range scanning needs such as large pumps, automobiles, and industrial equipment. Both phase shift and time of flight systems can also be used in terrestrial scanning applications where larger objects or structures of a couple of meters up to multiple kilometers can be surveyed.
Terrestrial TOF and phase-based scanning systems can come as stationary, tripod-mounted equipment, which can be used as-is or mounted onto land-based or aerial vehicles for projects that require information from vast landscapes or inaccessible areas.
Triangulation
The third type of laser-based scanners operates on the principle of triangulation, where laser light is emitted and returned to a specific location on an image sensor array of an inboard camera. To calculate the distance between the object and the 3D scanner, the system uses trigonometric triangulation because the laser source, the sensor, and the target left on the object form a triangle. The distance between the laser source and the sensor is known very precisely, as is the angle between the laser and the sensor. As the laser light bounces off the scanned object, the system can measure the angle at which it is returning to the sensor, and therefore the distance from the laser source to the object’s surface.

Triangulation-based laser scanners work at much shorter ranges (less than 5 meters) than the time of flight or phase shift scanners due to the small dynamic range of the image sensors and decreased accuracy with range. Most triangulation systems also come with an internal RGB capture option.
Commonly, triangulation-based scanners are most suited for scanning smaller objects ranging in size from 1 cm up to 2-3 meters, depending on the manufacturer. As for the form factor, there are stationary, tripod-mounted triangulation scanners. However, this technology meets the most success when used in portable handheld 3D scanners.
Applications of laser scanners
Laser scanners are used in a wide variety of fields, and for a wide variety of applications: from construction and civil engineering to forensics and archeology. As the technology becomes cheaper, lighter, and smaller, more and more industries are getting into laser scanning. Some well-known applications of these devices are listed below.
Reverse engineering

From small mechanical components to massive industrial objects, laser scanners have become an essential technology in the toolkits of professionals involved in product design and development. Once a complicated process that could require days of disassembly, detailed manual measurements, and the painstaking process of examining each part of a product, thanks to laser scanning reverse engineering now takes anywhere from a few minutes for a CAD surface model, to a few hours for a parametric CAD model. The scanners are used to create accurate digital blueprints of parts that have been damaged or deformed, need a redesign but don’t have CAD data available for them. Portable laser scanners with embedded processors are perfect for examining small and medium-sized objects, while medium and long-range devices work best for larger items. Instant creation of CAD models frees up hours if not days of work, which R&D teams can spend on the actual product enhancement.
Quality inspection

Another important stage of the manufacturing process and one more area revolutionized by laser scanners is quality inspection. Traditionally dominated by manual, contact-based measuring techniques, thanks to laser scanning quality inspection workflows can now be done way faster, more accurately, and with far more measurable data. This in turn results in fewer iteration loops and faster delivery of products to the customer. Unlike CMMs that can typically acquire dozens of point measurements one at a time, need to be in physical contact with the surface, and require programming for every new part to be examined, laser scanners can capture millions of measurements for various types of objects with a wide range of geometrical complexities in a fraction of the time, and completely contact-free.
Key point
Laser scanners have proved to be effective measuring tools for both industrial production and consumer-level applications: from reverse engineering to quality control, forensics, and self-driving cars.
Short-range laser triangulation scanners that come in the form of portable handheld devices provide flexibility over the types of objects to be inspected, as well as their location. They are great at capturing complex parts that would be impossible to measure by hand or with a moving touch-probe. Thanks to their lightweight design, such devices allow QA managers to be more mobile without being tied to a particular place or area.
Long-range laser scanners are perfect for examining and collecting accurate and measurable data from large objects, and can even be paired with a handheld scanning solution for capturing smaller elements in high detail. The resulting 3D model captured with a laser scanner can be processed in a scan processing software, then converted into a CAD file. At this stage, it can be compared to the original CAD model, and the parts which are in or out of tolerance can be identified.
Forensics

Thanks to their capability of capturing large spaces such as room interiors, buildings, and entire sites, laser scanners are becoming the new go-to solution for the accurate documentation and investigation of crime scenes, and reconstruction of accidents. Unlike traditional evidence collection methods such as photo and video cameras, and measuring tapes, laser scanners allow investigators to capture entire crime scenes in their original state, with precise dimensions for every piece of evidence, be it a body, a footprint, or a bullet hole, and do it all in a matter of minutes.
Portable handheld laser scanners with embedded processors are perfect for capturing standalone items on the go at multiple locations within a day, and can be brought in when higher and more accurate data is needed, e.g. a closer scan of a dead body, a damaged piece of furniture, or close up scan of a footprint left by the criminal. Long-range scanners, on the other hand, are useful for capturing an entire space. By having it placed in the middle of the room where it scans fully automatically, the investigator can engage in other parts of their work, such as talking to witnesses and victims, without a need to control the scanner. The 3D data enables forensic experts to have a fuller and much more detailed picture of a crime scene and build stronger and more decisive cases to present in the courtroom.
Construction (BIM)

Another popular application of long and medium-range terrestrial laser scanners, particularly among architects and construction technicians, is 3D capture of buildings and entire construction sites. Such devices allow facility owners or construction project managers to quickly create accurate documentation and 3D visualization of existing buildings and their conditions. They are also used to track the progress of construction and quality inspection of newly constructed projects and compare them with an as-designed model. Laser scanners not only save the time and cost used for manual measurements, they also increase safety conditions when working in unsafe locations. Laser 3D scanners can be used throughout the whole lifecycle of the building, and provide permanent and rich 3D data that can be used for renovation or new building projects, and be accessed anytime.
Archeology

Archeology is another area where laser scanners have become indispensable tools for 3D documentation of archaeological excavations, be it a single bone of an extinct animal or an entire ancient city. Portable handheld laser scanners with embedded processors come in handy in fieldwork, and allow archeologists complete autonomy in capturing their discoveries. Thanks to the built-in screen, they can see the results of what they scan in real-time, without carrying an additional laptop or tablet at the same time. Long-range terrestrial and airborne laser scanning systems are successfully applied to map topography, excavations planning, and spot archaeological sites that researchers would never be able to see with the naked eye, thus leaving them hidden.
Laser scanners allow archeologists to collect reliable and high-resolution data much quicker than they’d be able to with other methods such as total stations, GPS devices, or photogrammetry, saving them hundreds of hours of labor during an excavation. Thanks to their non-destructive, contactless nature, they can be used to capture fragile and vulnerable historical pieces in their original state. The data collected can be used for archaeological documentation and for creating virtual-reality models, restoration, preservation, and demonstration of archeological discoveries for the public.
Mobile mapping

One more application of long-range laser scanners is mobile mapping – the process of collecting 3D geospatial data, in other words, where objects are positioned on Earth, from a mobile vehicle either land-based (cars, trains, boats) or airborne (drones, helicopters, or planes). Mobile mapping systems are typically fitted with various navigation and remote sensing technologies such as GNSS, cameras, and LiDAR. The combination of all these technologies allows professionals to visualize, record, measure, and understand environments, whether it’s for road and rail networks management, urban planning, analyzing underwater or underground structures, improving safety in power plant infrastructure, designing digital maps – the list goes on and on.
Artec 3D laser scanners
As we approach the end of our review, it makes sense to at this point look at some real examples of different laser scanners. Here at Artec 3D, we have two types of laser scanners. One is handheld and works best for medium-sized to large objects over short distances (0.35 – 1.2 m) – Artec Leo, while the other one is a phase-shift scanner with an operating range up to 110 meters – Artec Ray.
Artec Leo

Artec Leo is a portable, handheld, and versatile triangulation-based structured light laser scanner that remains in a league of its own. All thanks to the built-in computing unit, HD display, Wi-Fi, and a battery that enables scanning and reviewing results in real-time with no other gear (PC or tablet) needed. The scanner can capture up to 35 million points per second and create highly detailed point clouds with 0.1 mm precision and 0.2 mm resolution in a matter of seconds. The large field of view (838 × 488 mm for the furthest range) allows Leo to scan and process quite a variety of object sizes, from small 20-50 cm parts to larger objects or even scenes, from 50 to 200 cm and bigger. Leo utilizes Class 1 VCSEL laser as a light source, which is completely safe for eye exposure, and can be used for scanning both inanimate objects and people. Leo’s design provides complete autonomy and flexibility over the scanning process, which is why its applications go far and wide: from reverse engineering and CAD-based design to healthcare, archeology, forensics, and many more.
Artec Ray

Artec Ray is a phase-shift long-range laser scanner designed to capture large and very large objects, such as buildings, airplanes, wind turbines, and the like, with submillimeter accuracy. The scanner has an operating range of 110 meters and can capture up to 208,000 points per second by rotating 360 degrees around itself and vertically with a 270-degrees viewing angle. Unlike many long-range scanners, Ray acquires highly accurate and clean data, which makes it usable for reverse engineering and quality inspection purposes. It comes with a tripod and can work autonomously both indoors and outdoors, thanks to a built-in battery, onboard Wi-Fi, and a mobile app that enables remote control of the scanner. The data captured with Artec Ray can complement more dense and feature-rich scan data acquired with Artec’s handheld scanners.
更多信息请访问
学习中心
选购扫描仪时最重要的是选对分辨率。此外,准确度也很重要,它决定了虚拟作品与现实中物体的差异。
三维扫描的成本多高,受到诸多因素的影响。本指南将聊一聊这些影响因素,便于您决定是入手一台扫描仪自用,还是寻求专业扫描服务。
为真正了解世上最优秀的三维扫描仪如何采集各种尺寸和难度的物体,我们必须先深入了解结构光工作原理。本文旨在深入浅出地向您阐释结构光相较于其他技术的优势,包括三坐标测量机、CGI摄影测量法。随后,我们将介绍对于结构光三维扫描仪而言,难度较大的表面可能有哪些特征。


